JaWesome Documentation
Thank you for purchasing the JaWesome portfolio theme. If you
have any questions that are beyond the scope of this documentation,
please feel free to ask us at the themeforest.net comments section.
You can e-mail us at jaw(a)jawtemplates.com
as well.
Installing
the Theme
System Requirements
The JaWesome portfolio theme has been tested in WordPress 3.9. However,
we strongly recommend that you always use the latest stable version of
WordPress to ensure that all known bugs and security fixes are
addressed.
Server Requirements
The recommended minimum requirements are:
- PHP 5.3+
- MySQL 5+
- Apache 2.0 (2.2+ recommended)
- mod_mysql
- mod_xml
- mod_zlib
Browser
Requirements
The back-end administration requirements of the JaWesome admin panel in
order of preference are as follows:
- Firefox 4+
- Safari 4+
- Google Chrome 3+
- Opera 13+
- Internet Explorer 9+
Installation
Procedure
Except the theme itself, the JaWesome consists of three other main parts
to be installed separately as the theme's add-ons, and of a 3rd party's
plugin as well. These are the following add-ons:
- JaW Menu for JaWesome Template
- J&W Portfolio
- J&W Shortcodes
- J&W Widgets
- SoundCloud Shortcode
- Contact Form 7
- Category Order and Taxonomy Terms
Order
- Envato Wordpress Toolkit
Upload the Theme
IMPORTANT: Make sure you unzip the downloaded file
from ThemeForest first (DON'T upload it to your server yet). This file
contains the actual theme in zip file called JaWesome.zip.
This is the theme file. Now install the theme by one of the following
two methods:
- Upload the JaWesome.zip file through the WordPress
admin backend (This will ONLY work if the server that hosts your
website allows upload limits greater than 6 MB. Please note
that the most hosting providers have only up to 2 MB file upload
limit).
- If you prefer direct access to your folders on server (or uploading
the file using WordPress doesn´t work), use this method. First, unzip
the JaWesome.zip file, then upload the extracted JaWesome/
folder to /wp-content/themes/
using your FTP client so that the structure was as follows: /wp-content/themes/JaWesome/.
Activate the JaWesome portfolio theme
If the upload of theme was successful, you can see the JaWesome in list of
the downloaded themes. You can activate it now.
Configure your theme options
To set up your theme, navigate to
Appearance > Theme
Options (see the
2.
JaWesome Settings chapter below).
Recommendations
to optimize the performance of your website
After you build your site, we recommend that you deactivate all the
shortcodes you don't use in
Plugins > J&W Shortcodes.
Remember that loading the unused parts of various add-ons may needlessly
slowing down your web.
We also recommend use of some PHP OPCache on your hosting - e.g. APC and
XCache. On the Wordpress side we recommend installing the W3 Total Cache
plugin, in which is advisable to activate combination and minification of
CSS and JS scripts and activate cache for clients (Gzip, file cache).
Updating
the theme
In order to keep your theme bug free and ensure its continuous optimum performance,
we recommend that you regularly follow updates or automatic notifications
of new updates that we release. So, how to update? the best way is to
use the Envato Wordpress Toolkit plugin. Please follow this
tutorial:
http://premium.wpmudev.org/blog/envato-wordpress-toolkit-a-themeforest-auto-updater/.
If for some reason the mentioned updating process isn't successful, we recommend that you copy the necessary files directly via FTP. To learn more, follow
this video tutorial that shows the generally valid procedure using another our theme taken as an example.
- HINT: We strongly recommend that you make a
backup before each updating of your theme.
JaWesome Settings
You can customize the overall functionality and look of the theme to your
needs using the options in
Appearance > Theme Options.
General Settings
Here can be set up some of the most basic properties of your site. You can
upload your favicon or manage transition effects.
Favicon
Click [Upload]
button and upload your prepared 16px × 16px
PNG/GIF image that will represent your website's favicon.
Use JavaScript to Load Page
Decide whether or not to allow using of various JavaScript-based
transition effects when you pass through pages/posts.
- NOTE: If you use some other plugins, they may
work improperly if you turn this option on!
Scroll to Top After Loading Ajax
Turn this option on if you want to automatically scroll every next page or
post to its top when you pass through the posts. To make it work, you need
to have the previous
Use JavaScript Load Page option
enabled.
Ajax Page Transitions
Choose a transition effect you want to apply when passing through
pages/posts.
Ajax Spinners
Here you can choose a spinner animation that appears during loading of
content. To see how the Ajax spinners look, visit the
tobiasahlin.com/spinkit/ demo site.
Ignore
Ajax Element
There is a possibility to hang any custom element on your page in such
way, that it is permanently displayed on its place, independently on how
the remaining main content changes when a visitor refreshes the page or
passes through your web. To specify the element(s) to be excluded from
re-loading a page (i.e., to be displayed on all your pages), enter their
classes or ID names into this field.
Ignore URL Element Links
This feature allows to ignore all links that contain the strings you
specify. Enter these strings into the field and separate them by coma.
Main Panel
Settings
the following options allow you to customize placement/look and behaviour
of your main panel.
Main Panel Placement
Choose one of the possible placements of your main panel.
Logo
Settings
Logo: Click the [Upload] button to select and upload your
own logo. To remove the uploaded one, use the [Remove] button.
Retina Ready: This option allows to display your logo in
high quality on the Retina displays.
- NOTE:
Although you can use your logo with the dimensions you need, let us
take our logo as an example to explain the issue. Size of this logo
is 234×88 px if it has not to be retina ready. If you prepare a
retina ready logo, you should create it with double width and
height, i. e. 468×176 px. Remember that if the Retina Ready
option is set on, your logo will be displayed in its half size on
non retina displays, so it won´t affect the actually displayed size.
Make sure you have set the option off if you use a standard
sized logo (234×88 px), otherwise it couses that
the logo will be displayed too small on both of display types.
Featured
Area
Custom Featured Content: Here you can put your own
content to be displayed in the featured area. You can use a simple text,
HTML content and shortcodes as well. To get a shortcode you need, create
but don't save a new post and use the

shortcode button in its WISIWYG editor.
Copy the shortcode/s into clipboard and paste it/them into this field. For
more information, see the
6.
Shortcodes chapter.
Show Search: Decide whether or not to enable searching on
your site. Turn this option on to show the search link in the featured
area or turn it off.
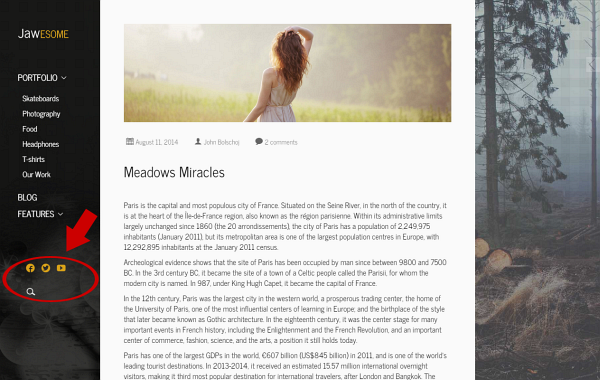
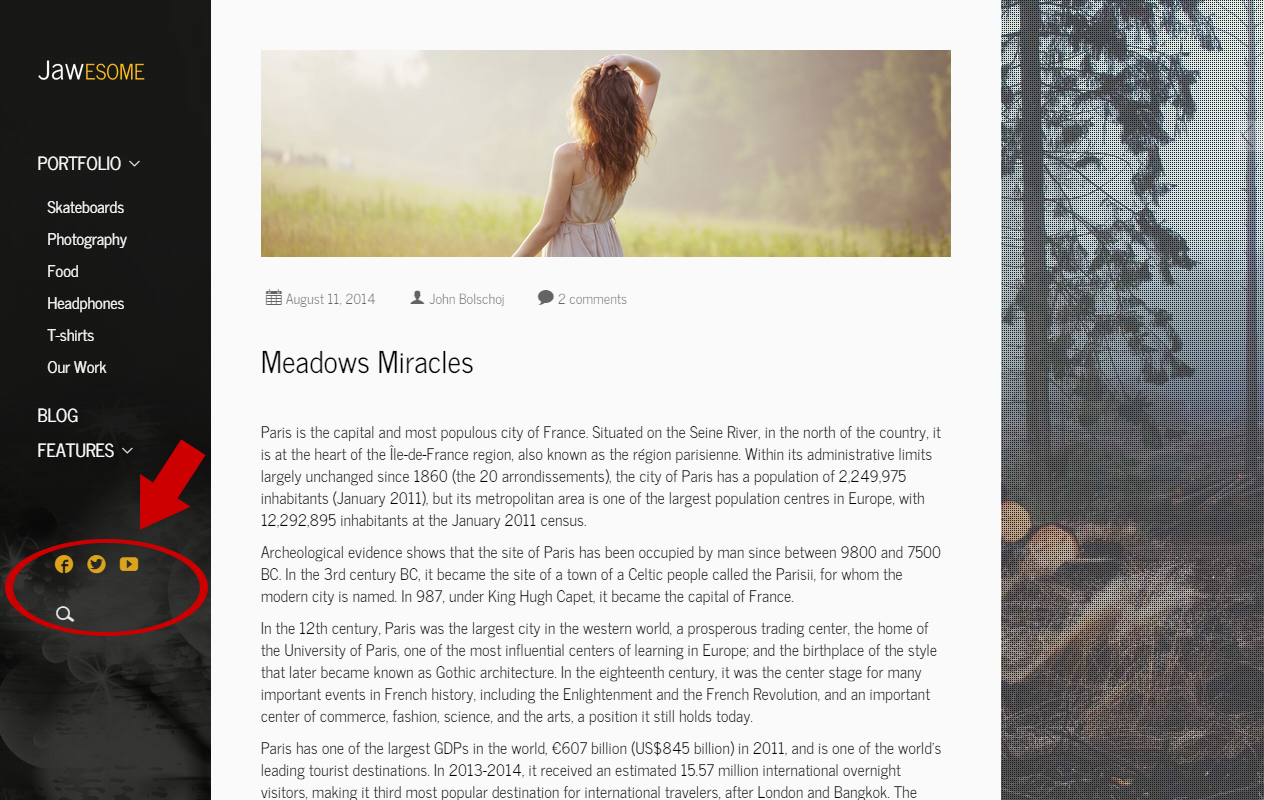
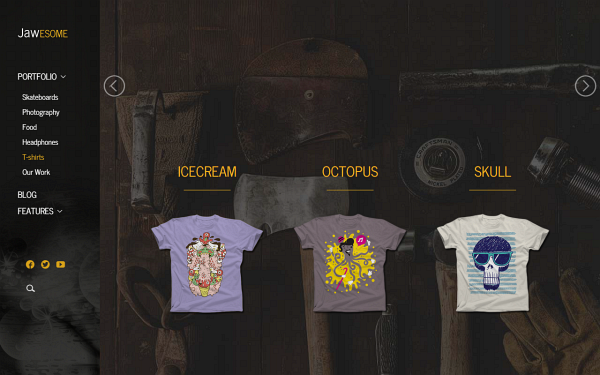
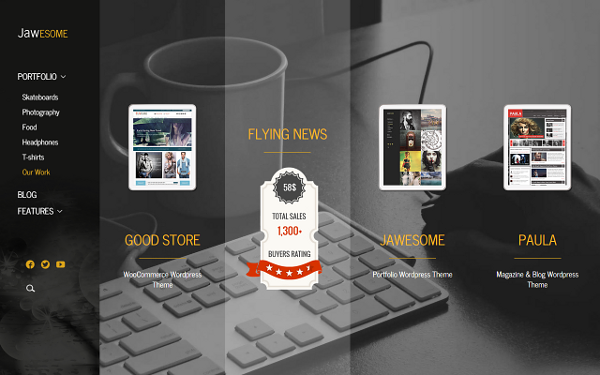
This is the featured area that you can customize by
the Custom Featured Content and the Show
Search options.
Portfolio
You can decide to show or not to show the
Rating,
About Author and
Share This boxes in your portfolio. Here is the place, where to make the default settings for the whole site. You may, however, make a different settings for any particular portfolio item. To do it, open the portfolio and set its options according to your needs. For details, go to
5.2 Portfolio Items subchapter.
Blog & Posts
Here you can find all the options you need to set up your blog and
posts.
2.3.1 Main Blog
Include Category
Click into the field/dropdown list and choose all categories you want to fetch posts from.
Post Order
Here you can choose the posts order way you prefer –
ascending
or
descending.
Post Order by
Order posts by their parameters:
Date: Order by date
None: No order
ID: Order by post ID
Author: Order by author
Title: Order by title
Modified: Order by a last modified date
Parent: Order by post parent IT
Rand: Random order
Number of comments: Order by number of comments
2.3.2 Blog Overview
Pagination
Style
Select the pagination style you prefer from the following options:
infinite: Allows the consecutively automatic loading of
all your posts in batches when the page is scrolling
infinite with more: Performs the same, but not
automatically – you need to click on the „more“ link after each loaded
batch of posts
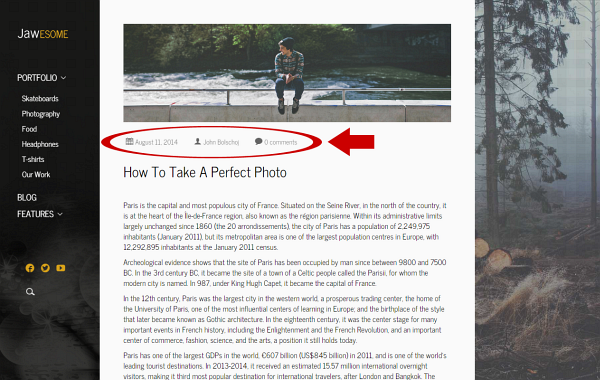
Meta Data
Here you can set up what has to be shown in the post preview.
Meta Author: Choose whether or not to show author´s name.
Meta Date: Choose whether or not to show date.
Meta Number of Comments: Choose whether or not to show
number of comments in the post preview.
Post Date Format: Define the date format for your posts.
Please visit the link next to this option to learn how to use the
characters convention.
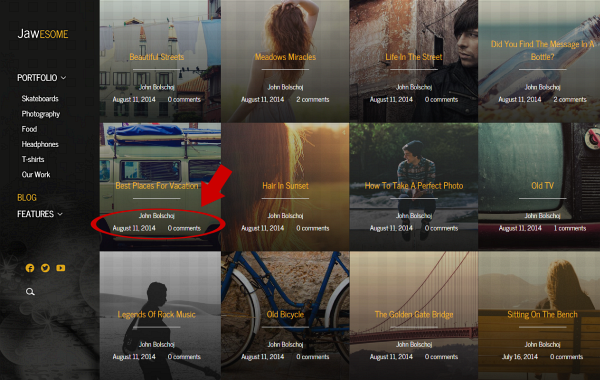
Look at where the Meta Data
appear in a post preview tile on the blog overview page.
2.3.3
Single Post
Post Layout
There are three preset layouts for your post content. Here you can choose
one of them. Depending on what layout you choose, the options below will
vary.
Post Left/Right Sidebar
You can choose one of the sidebars, you have created in the
Sidebar
Manager settings and add it to the right.
Sharing Post Area
Choose whether or not to enable an area with various sharing options
available below the posts.
Related Posts
Turn this option on if you want to show the related posts section on your
post page.
Related Posts - Showing Images
Turn this option on to show featured images in the related posts section
on your post page.
Number of Related Posts
Enter a number of related posts you want to show.
Show Tags
Choose whether or not to display tags below a single post.
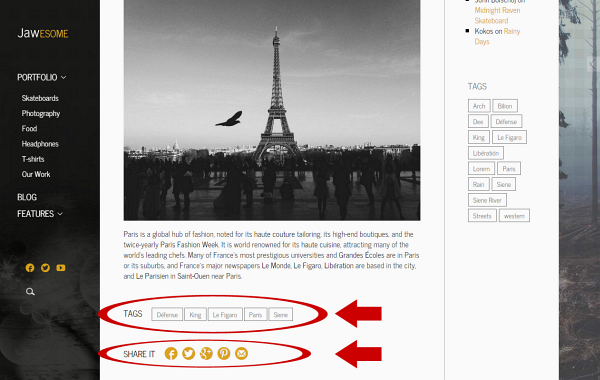
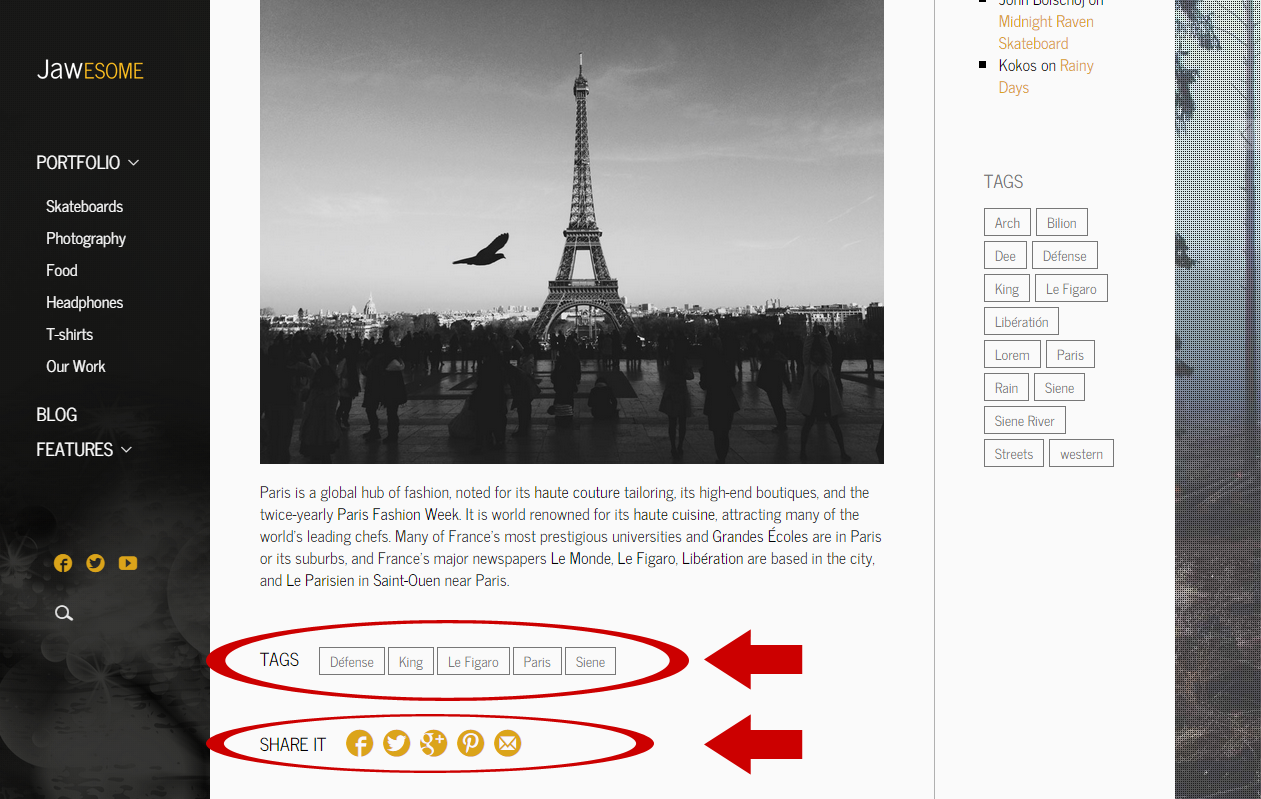
An example of Tags and the Sharing
Post Area displayed on a post page.
About Author
Choose whether or not to display the author's name with photo and
description in a post.
Meta Options
Here you can set up what has to be shown in a single post.
Meta Post Author: Decide whether or not to show
author´s name.
Meta Post Date: Decide whether or not to show
publishing date.
Number of Comments: Decide whether or not to show
number of comments in posts.
If enabled, here the Meta Options
take effect in the sample single post.
Sharing Options
You can add icons of the most common social networks and services you want
the post to be shared on to the
Sharing Post Area. Choose from
Facebook,
Twitter, Google, Pinterest and
E-mail items.
Comments
Turn on or off the
Show comments depending on your
choice.
Facebook Comments
Here you can set up your Facebook Comments. To make the options work, you
have to enter your Facebook App ID in the
Advanced
section.
Facebook Comments: This option gives you choice to toggle
between wordpress and facebook comments.
Number of Comments: Enter a number of comments to
display.
Sidebar
Manager
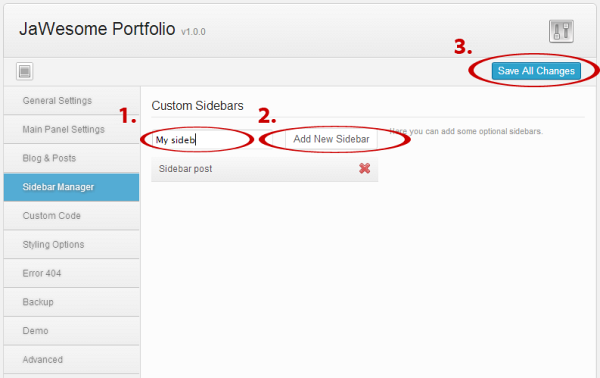
This is the place where you can add your optional sidebars.
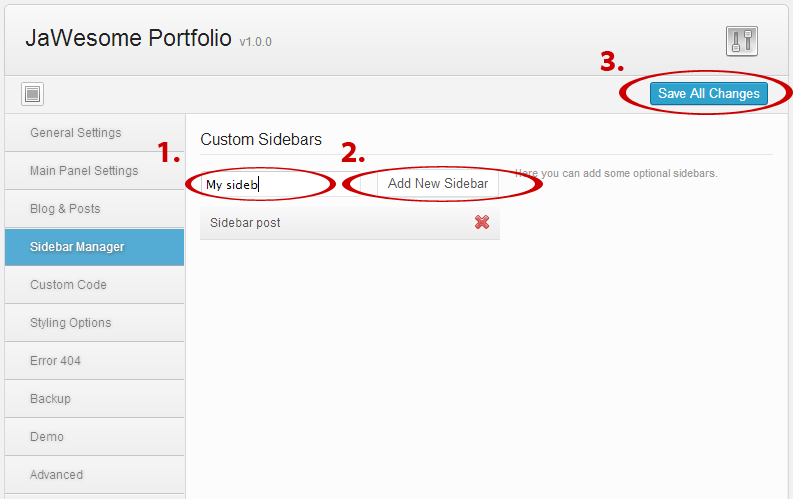
Custom Sidebars
Fill in the field with a name you want and click the [Add New Sidebar]
button. In the same way you can create all sidebars you need. Clicking the
cross

removes the chosen sidebar. Once you are done, don't forget to save your
changes. Notice that you find the created sidebars in the Widgets settings
and can assign some widgets to them.
Custom Code
There are several fields for your CSS, javascript and analytics codes.
Custom
CSS allows you to implement your own styles in the selected
preset (it will paste the inline css styles in code). Similarly, the
Custom
Javascript allows you to implement a javascript. Paste your
Google Analytics (or other) tracking code to the
Google Analytics
field to show the desired outputs in the footer of your theme.
Styling Options
In this section you can choose some color presets for your theme, as
well as customize color variations according to your wishes. Colors can
be inputted via the colorchooser popup selector or manually using a hex
code in the input field.
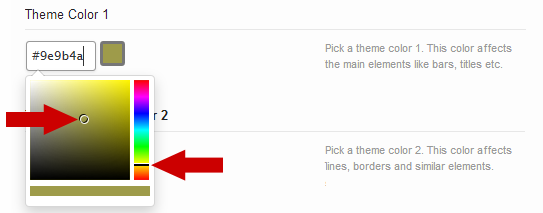
To activate the colorchooser, click into the value field and move both
the right scroll
bar and the pointer across the color palette until you find the color
you need.
- HINT: As there are lots of particular color
settings for various elements of your site, we recommend that you
follow the explanatory screenshots under the preview icon
 next
to some of the styling options to be able to better understand the
settings looking at where they appear on your web.
next
to some of the styling options to be able to better understand the
settings looking at where they appear on your web.
Template Background Settings
Background Color: Pick a color from the palette or enter
a hex code.
Background Image: Click [Upload] button to upload your
background image.
To
remove the image, use the [Remove] button.
How to Use Background Image: There are two possible ways
to use your background image. You can use just the clear image, or
moreover to overlay the background by pattern. the second option is
advisable e. g. if the image is not sharp enough or simply if you like
this attractive effect.
Background Video (mp4): Choose a video in mp4 format you
want to use as background of your portfolio category.
Background Video (WebM): Choose a video in WebM format
you want to use as background of your portfolio category.
Background Pattern: Decide whether or not to use a
background pattern.
- NOTE: If you use a video as background, both
the MP4 and WebM formats must have been set, otherwise a proper
functionality won't be ensured. To learn more about the issue,
visit this
page on www.w3schools.com, please.
Theme Color Settings
Here you can define custom colors of some groups of elements on your
web.
Load Color Scheme: Choose a color scheme you want to use. These colors affect all the main graphic elements of the theme, but you can also modify many of individual elements by using the following settings.
Theme Color 1: This color affects the main elements
like titles in sidebars and background of text elements like boxes, comments etc.
Theme Color 2: Affects especially background of text elements like boxes, comments etc.
Theme Color 3: This color affects lines, borders and similar elements.
- CAUTION: Selecting a color scheme in the Load Color Scheme option will cause loss of the existing color
settings. After selecting an item you will be informed about this and
asked whether to continue.
- HINT: As there are various combinations of text and background elements included in the preset Theme Colors, we recommend choosing rather mutually contrast Theme Colors (1, 2, 3) in order to achieve a good readability of your page content.
Scroll Bar Color Settings
Note, that this theme doesn't show scroll bars in the common way you know from your browser, but replaces them with its own ones. Here you can choose a color of the scroll bars.
Form Color Settings
These options affect look of form on your site.
Menu Color Settings
Here are several settings available to define colors of your menu items.
For details, see the related descriptions and/or click the preview icon.
Font Color Settings
These options allow you to set font colors for paragraphs and links. For
details, see the related descriptions.
Posts and Pages Color Settings
Define color settings for your posts and pages. For details, see the
related descriptions.
Theme Fonts Settings
Title Font: Here you can change the title font. This
doesn´t affect the font size, both the typeface and color remain
standard.
Paragraph Font: Paste your paragraph font name into the
field and choose a size, style, and color from the dropdown lists.
Custom Font Sizes
Here you can define font sizes for various text elements on your site.
Enter all the values in multiples of the
Paragraph Font size you
have set above. Use decimal point in the values.
Portfolio Color Settings
These options affect the main elements of the "About Author" box.
-
NOTE: the colors you set here will be used as default for the whole site, but you can set different colors for each portfolio category separately (Portfolio > Portfolio Categories) assuming that the Display on Page option has been set to Columns of Categories or Columns of Items for such categories. For details, go to 5.1 Portfolio Categories subchapter.
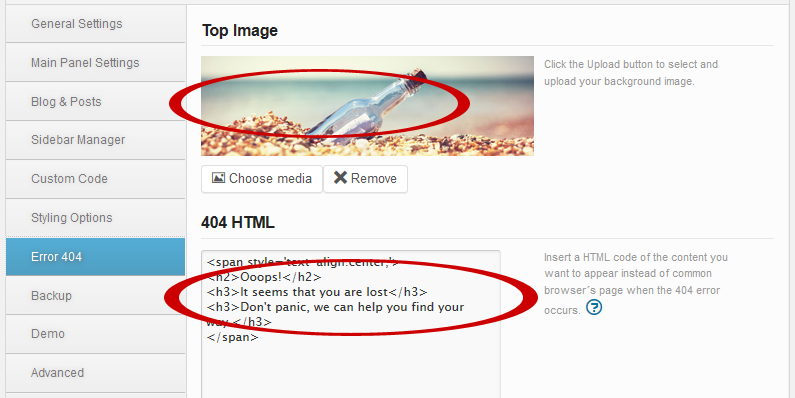
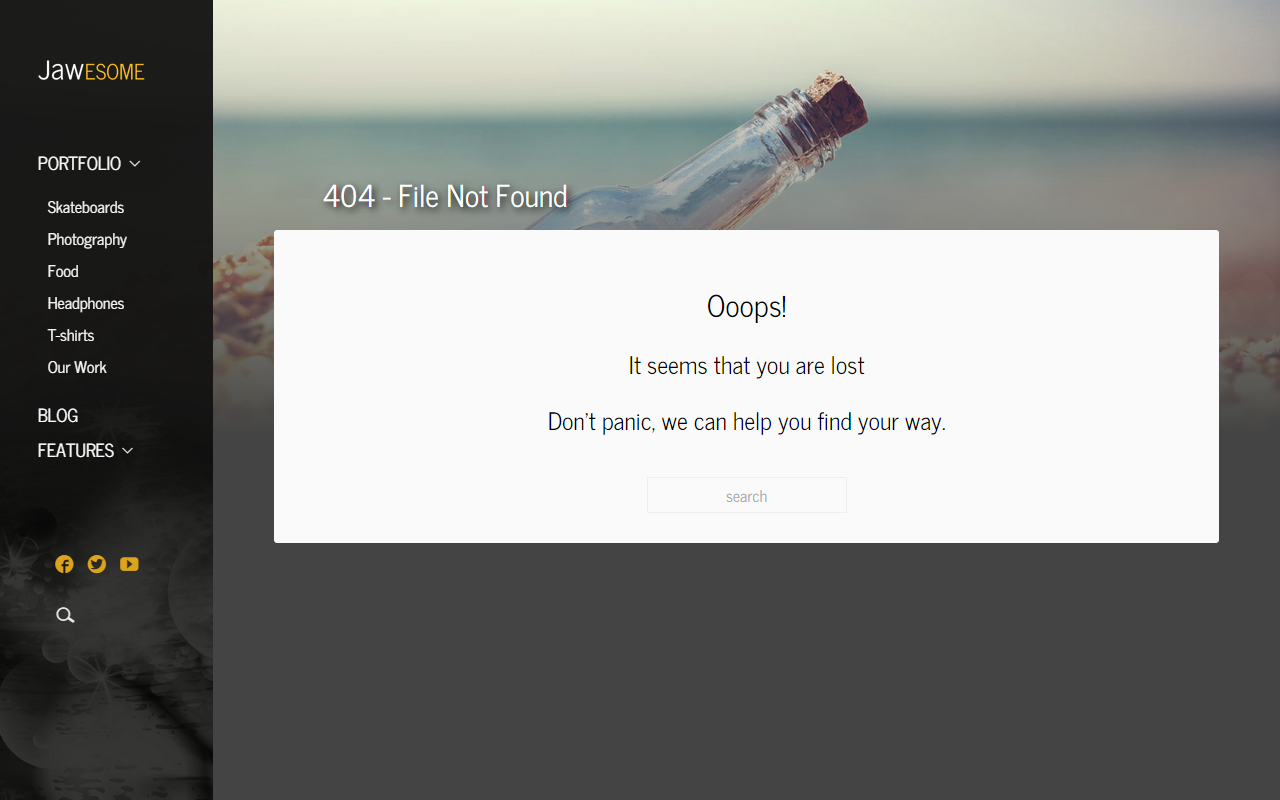
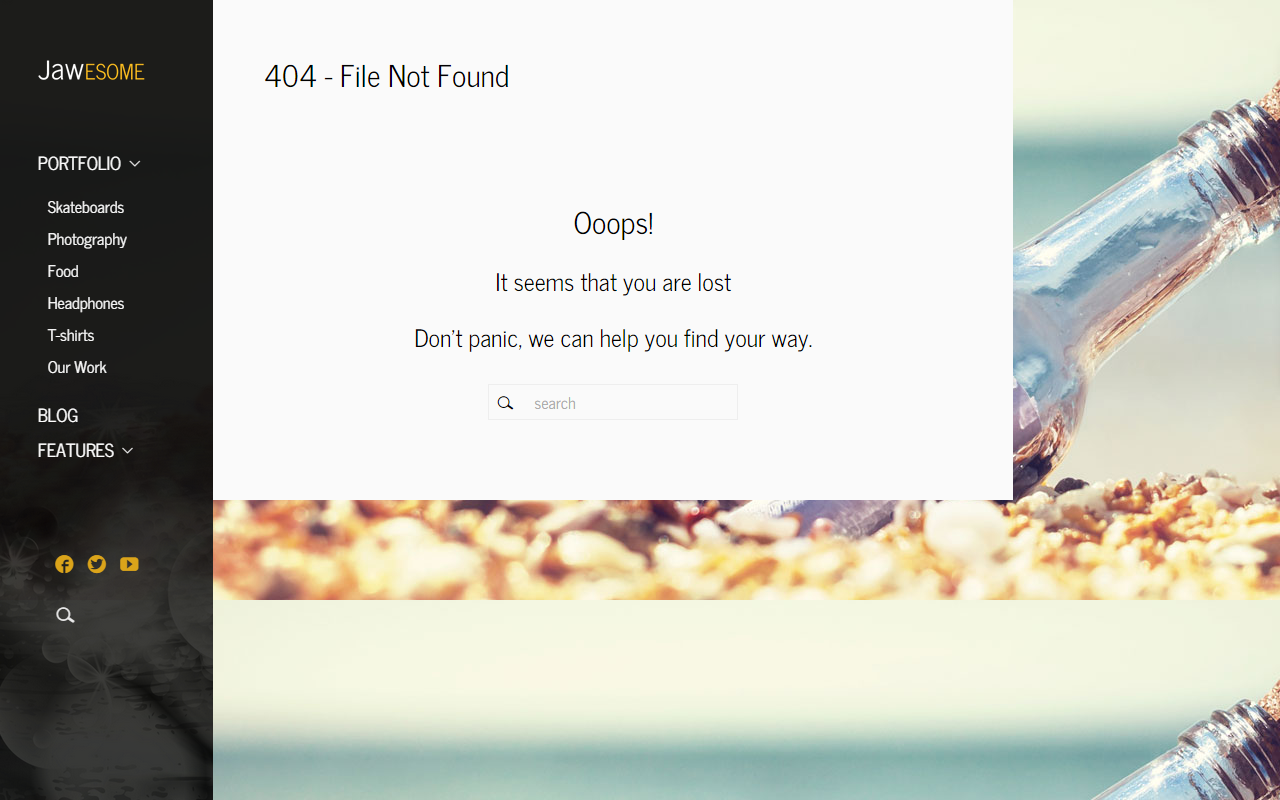
Error 404
Here you can create your own custom html 404 Page with or without a top
image. Simply set the
Top Image and enter the
404
HTML code you want to appear instead of a common browser's page
when the 404 error occurs. If you leave the Top Image
option
empty, the top area will be filled with the background color you have set
in
Styling Options >
Posts/Pages > Top Background Color.
Backup
- HINT: We strongly recommend that you make a
backup before each updating of your theme.
Backup and Restore Options
Here you can backup your current options and then restore them back at a
later time. This is useful if you want to experiment on the options but
would like to keep the old settings in case you need it back. Click the
[Backup Options] button to backup your current saved options in the
Category,
Menus and
Theme Options. If
you need to restore the options, click the [Restore Options]. Please read
carefully the warning message which will appear.
Backup to Google Drive
You can easily backup your settings to the Google Drive. To do it, click
the button. All the setting will be encoded and uploaded to your Google
Drive.
Transfer Theme Options Data
You can transfer the entire saved Theme Options data between different
installations by copying the text inside the text box. To import data from
another installation, replace the data in the text box with the one from
another install and click the [Import Theme Options].
- HINT: You can simply copy the data from the box
to some txt file and keep it as backup.
Transfer Category Options Data
To import category options data from another installation, replace the
data in the text box with the one from another install and click the
[Import Category Options].
Demo
If you need or would like to upload the sample data to make your website
look like our demo, click the thumbnail of the demo site you prefer.
- IMPORTANT: When uploading the demo content you
may lose your data. Please don't forget to back-up your database
before you choose an option.
Advanced
There are several special options that you can choose and set up for your
page.
Notification of New Updates
If you want to be informed about new available updates, turn this option
on.
Social Plugins Language
Here you can select the language of your choice for social plugins. Please
visit the link at this option to get the language codes list.
Facebook API
Facebook App ID: You have to enter your Facebook App ID
to be able to share your site and to make a Facebook commentary.
FB Comment Moderation Area: If you
are a moderator, you will see notifications within facebook.com. If you
don't want to have moderator status or want to see all comments in one
area, use the Comment Moderation Area link.
Comments Antispam Question
Here you can manage an antispam solution for comments on your site.
Enable an Antispam Question: Turn the option on to enable
an antispam question (specified below).
Comments Antispam Question: Fill in the field with an
easy question to be answered by user before inserting comment.
Comments Antispam Answer: Insert a proper answer to the
question.
SEO Options
the following options allow you to make few basic optimalization settings
of your page for search engines.
Use Built-in SEO - the JaWesome theme uses built-in SEO
solution. If you want to use some different SEO plugin, deactivate this
option.
Logo in H1 - turn on this option to put your logo between
H1 tags. It may give better results for your site on search engines.
Pages
The theme gives you several options to set beyond the common page
settings you know from Wordpress.
Homepage
You can decide which of your pages to set as homepage. As you use the
portfolio theme, it may be a good idea to set any of your portfolios as
homepage. To do it, create a new page (Pages > Add New),
set its options and don't forget to select the Overview of
portfolio categories item from the Template
dropdown list in the Page Attributes box. After selecting the
item, a list of categories appears in the Portfolio
Settings box at the bottom (see the 3.3
Portfolio Settings subchapter). Choose the category you
want to show on your homepage, save the page and set it as homepage in a
common way in Wordpress (Settings > Reading).
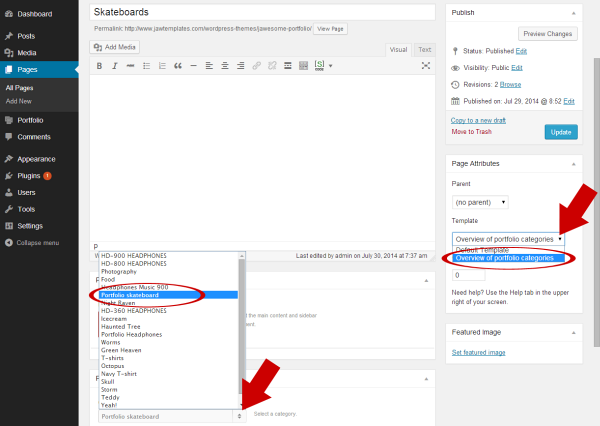
Sample
settings of a page that has to be used as homepage. You need to select
both the Overview of portfolio categories option in
the Page Attributes/Templates settings and a category
you want to show on your homepage.
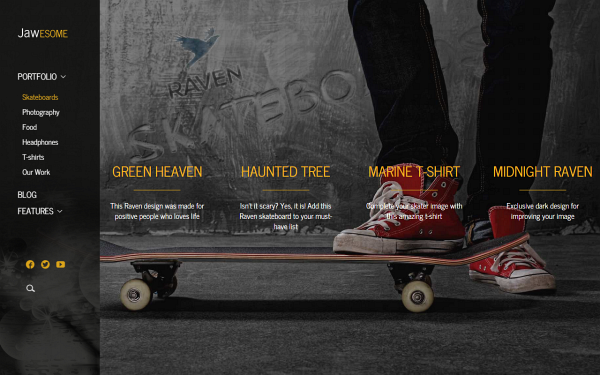
Example of a homepage that consists of the page we
have set in the figure above.
Page
Settings
Post Layout
There are three preset layouts for your post content. Here you can choose
one of them. If you choose layout with left or right sidebar, the
following option will appear.
Post Left/Right Sidebar
You can choose one of the sidebars, you have created in the Sidebar
Manager section and put it to the left or right.
Portfolio
Settings
Categories
This option is available if you have selected the
Overview of
portfolio categories item from the
Template dropdown
list in the
Page Attributes box (see the
3.1
Homepage subchapter). Choose a category you want to show
on your page.
Posts
General Settings
Posts probably represent the most common content on your web. Here you can
easily set up some special features for all your posts and for the each
one of them separately. After you create a new post (
Posts
> Add New), you can see the mentioned options placed
below the main content field. Obviously, there are the same settings
available when you edit the posts you have already created.
Post Layout
This option allows you to choose one of the preset layouts for your post
page, with a sidebar on the left or on the right, or without it. The
Default Page Layout option uses the Post Layout set in
Theme
Options > Blog & Posts > Single Post. If you
choose layout with left or right sidebar, the following option will
appear.
Post Left/Right Sidebar
You can choose one of the sidebars, you have created in the Sidebar
Manager section and put it to the left or right.
- How to set a TOP IMAGE for your post?
the theme allows you to fill a top background area of each partial
post with a suitable graphics. For this purpose we recommend that
you prepare a wide landscape image with sufficiently high resolution
(its a good idea to keep the same dimensions for all the top images
you use). Set the prepared top image as Featured Image, in
an appropriate post settings.
- If
your image isn't big/wide enough, it will be resized in width, but,
depending on its aspect ratio, may be cropped in height.
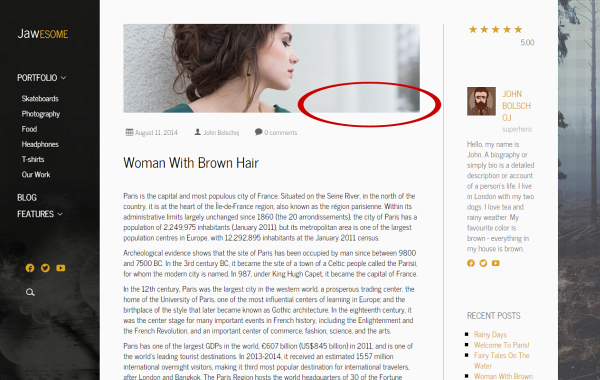
Example of post with a
top image. You can set a different top image for each
of your posts
via the Featured Image option.
Use User Rating
Here you can decide whether or not to enable user rating using the J&W - Rate Post Widget (for more information, see the
7. Widgets chapter). the rating will be displayed in sidebar beside the post, according to settings of the mentioned widget.
Portfolio
At first you need to create a category for your portfolio. Navigate to
Portfolio
> Categories, name your new category, set its options
and add the new portfolio category or categories (e.g. Photography,
Videography etc.) clicking the button below the options.
Than go to
Portfolio > Add New. Here you
create a portfolio item which type can be defined selecting a desired
option in the
Portfolio Type dropdown list below the
content field.
Portfolio
Categories
There are several options that can be set up for each portfolio
separately. Add a new portfolio category (as described above) or open an
existing one and make settings according to your needs:
Description
Fill the field with description you want to add to your portfolio category. You may use HTML tags in the description.
Description 2
Fill the field with a portfolio category description text to be displayed in the placement you have specified in the options below (
Show on Top,
Show on Bottom,
Show on Top - Hover,
Show on Bottom - Hover). You may use HTML tags in the description.
NOTE:
This option is available only if you select the "List of Categories" from the "Display on Page" dropdown offer below).
Click the [Choose Image] button and select the image which will represent
your portfolio category. To remove the thumbnail image, use the [Remove] button.
Thumbnail 2
Click the [Choose Image] button and select the second image that will be placed according to the
Show on Top,
Show on Top - Hover,
Show on Bottom and
Show on Top - Hover settings below. To remove the thumbnail image, use the [Remove] button.
Icon
You can choose an icon to be shown above the portfolio
category. To get list of available icons, visit
this
page. Find the icon you like and put/type its class name into the empty
field.
Icon 2
You can choose an icon to be used as the second one, in the placement you set in the
Show on Top,
Show on Top - Hover,
Show on Bottom and
Show on Top - Hover settings below. To get list of available icons, visit
this
page. Find the icon you like and put/type its class name into the empty field.
Display on Page
You can determine how to display the portfolio category on your page.
Select an option you prefer from the drop-down list.
- NOTE: Depending on your choice, more or less
other options will be available to set.
List of Items (Slider) - allows passing through your
portfolio items using a slider feature.
Grid List of Items - arranges your portfolio items into
grid of image tiles. the images are fetched from the "Portfolio Image"
set in each partial item's Portfolio Settings.
Columns of Categories - presents your portfolios in groups, displaying the items side by side. You can pass
through these groups using arrows. Notice that if you choose this
option, several other options to set appear below.
Columns of Items - presents your portfolio items in
groups of items that are displayed side by side. You can pass through these groups using arrows. Notice that if you choose this
option, several other options to set appear below.
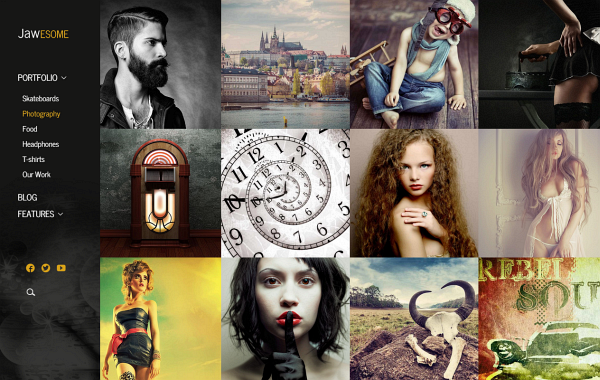
Compare the two different views of the same sample
portfolio category (Photography).
the first image shows the category with the
Display on Page
option set to
Grid List of Items.
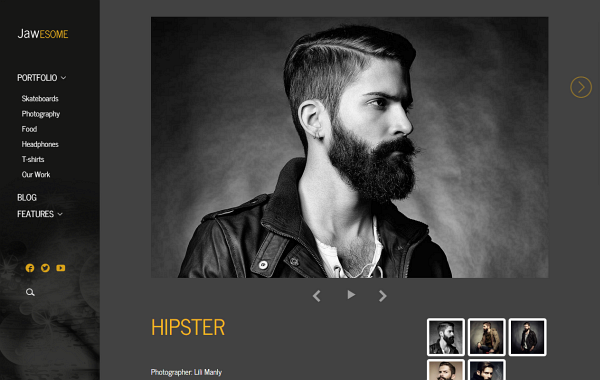
the second one shows how the category appears if the option has been
set to
List of Items (Slider).
Another example shows how looks a portfolio page if the
Display
on Page option has been set to
Columns of Categories.
the circled arrows allow you to pass through all the "T-shirts"
subcategories.
Click the image to explore this sample page on our live demo.
Background Source
There are two available sources you can choose a background for your
portfolio category from. To use a common background you have set in the
theme options, select the
Theme Options item; to specify
a background especially for the selected portfolio category, select the
Custom
Background item from the drop-down list.
Hover Effect on Portfolio Category Item
You can choose an effect to be applied when mouse is moved over the
category item. We recommend trying each of the effects to find out which
of them best suits your idea.
Hover Color
This color affects a highlight effect if mouse is moved over the category
item. Pick a color from the palette or enter a hex code.
Show on Top
Choose what you want to display on the top of each your item in the list
of categories. You can decide not to display anything or to choose from
Icon,
Icon2,
Thumbnail or
Thumbnail2 choices.
NOTE: This option is available only if you select the "List of
Categories" from the "Display on Page" dropdown list above.
Show on Bottom
Choose what you want to display on the bottom of each your item in the
list of categories. You can leave the place empty or fill it either with a
description of the portfolio category or with an
image,
or with
both of them.
NOTE:
This option is available only if you select the "List of Categories"
from the "Display on Page" dropdown list above.
Show on Top - Hover
Choose what has to appear on the top of each your item in the list of
categories if mouse is moved over (compare with the "Show on Top" option
above).
NOTE: This option is available only if you select the "List
of Categories" from the "Display on Page" dropdown list above.
Show on Bottom - Hover
Choose what has to appear on the bottom of each your item in the list of
categories if mouse is moved over (compare with the "Show on Bottom"
option above) (compare with the "Show on Top" option above).
NOTE:
This option is available only if you select the "List of Categories"
from the "Display on Page" dropdown list above.
Background Color
Set a background color picking a value from the palette or entering a hex
code.
NOTE: This option is available only if you select the "Custom
Background" from the "Background Source" dropdown list above.
Background Image
Choose an image to use as background of your portfolio category.
How to Use Background Image
There are two possible ways to use your background image. You can use just
the clear image, or moreover to overlay the background by pattern. The
second option is advisable e. g. if the image is not sharp enough or
simply if you like this attractive effect.
Background Video (mp4)
Choose a video in mp4 format you want to use as background of your
portfolio category.
NOTE: To ensure a proper functionality, you need
to set both the mp4 and WebM (the option below) video.
Background Video (WebM)
Choose a video in WebM format you want to use as background of your
portfolio category.
NOTE: To ensure a proper functionality, you need
to set both the WebM and mp4 (the option above) video.
Background Pattern
Decide whether or not to use a background pattern.
Portfolio
Items
There are several options you can set for each your portfolio item.
Portfolio Type
Select type of the portfolio item. You can choose from
Image,
Gallery,
Video and
Audio
options.
- NOTE: These options affect a preferred part of
content in your portfolio. E. g., if you have selected the Gallery
option, just your gallery/graphic content is displayed at the top of
page, followed by other content.
Style of Single Portfolio
Specify how to lay out content of the portfolio item. This setting affects
an arrangement of your portfolio's main elements, like image, thumbnails
and description.
Horizontal - arranges the main image and other
portfolio elements horizontally.
Vertical - arranges the content vertically.
Gallery - this setting is suitable especially for image
galleries or the kind of content where a graphics is the main part of
your presentation.
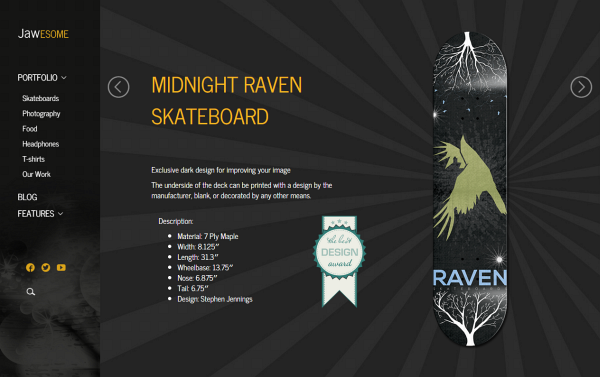
Example of horizontally arranged portfolio item -
with the
Product Horizontal option selected
in the
Style of Single Portfolio settings. Click the
image to explore this sample page on our live demo.
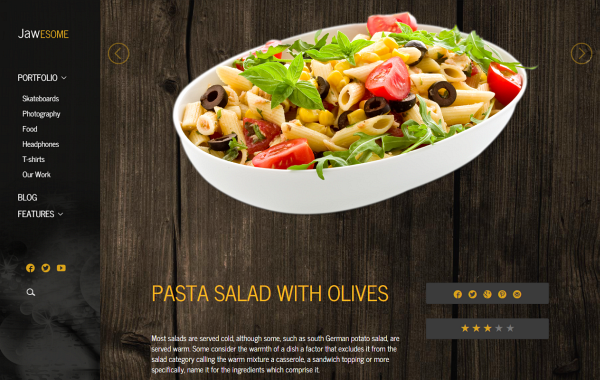
This example shows how the
Gallery style of single
portfolio may look like.
Click the image to explore this sample page on our live demo.
- HINT:
As a final look of your portfolio may distinctly vary depending on
graphics you'll use, we recommend that you compare different
settings for a partial portfolio item to find out which arrangement
looks better. E.g. for a content with the landscape-oriented wide
main image seems to be a better choice the "Product Vertical"
setting.
Portfolio Image
Select the main image for your portfolio or use the [Remove] button to
remove it.
Gallery
Click the [Edit gallery] buttton to be able to add or remove images and
modify their order in your gallery.
- NOTE: To view images/products from the gallery
in a more comfortable way, your visitors can pass through them using
few common and widespread shortcuts:
Left arrow key - go to previous image
Right arrow key - go to next image
Enter - start slideshow
This functionality needs to be activated clicking on the image.
How to Show Images/Videos From the Portfolio
There are two ways to present your graphic content:
In lightbox - opens lightbox to display your images.
Changing the main image - displays pictures from the
gallery on a position of the main image.
- NOTE: This option doesn't work if the Style
of Single Portfolio option above has been set to Gallery.
Video Gallery
Click the [ + ] button as many times as how many videos you want to add,
and fill each of the fields that appear, with the video source link. To
remove the video, click the [ x ] button next to an appropriate field.
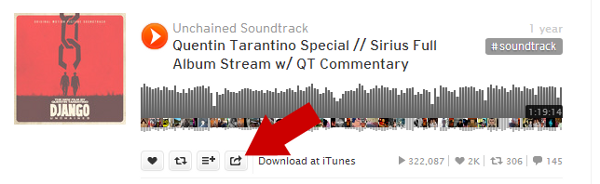
SoundCloud Shortcode
Enter shortcode with a link of an audio record stored on the SoundCloud.
To get the required shortcode, follow the steps below, please:
- Visit SoundCloud.com, find the record you want to present and click
the "share" icon.
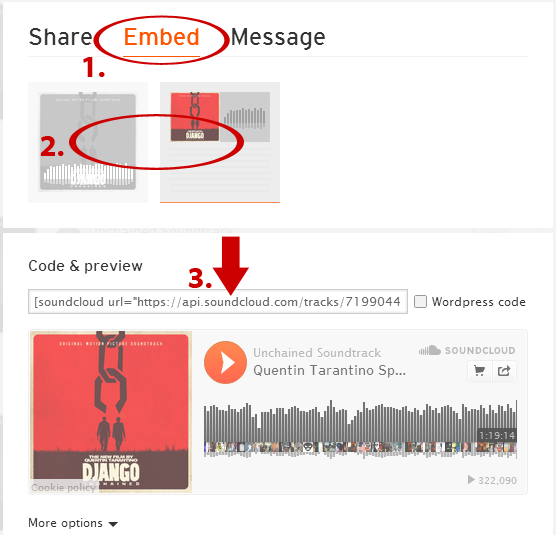
- When a new dialog appears (see the figure below), click the "Embed"
option (1), choose a style you prefer (2) and copy the code you'll get
(3) to clipboard. Use this shortcode as the SoundCloud Audio Source.
- NOTE: To use this option, you have to have
installed and activated the SoundCloud Shortcode plugin
and to have set an Audio Thumbnail (see the next
option).
Audio Thumbnail
Here you can set a thumbnail image for your audio record. Click the
[Choose media] button and select an image, or remove the thumbnail
clicking the [Remove] button.
Show Rating
Decide whether or not to display Rating box in the portfolio item. If you choose the
By Theme Options item from the dropdown list, the box will or won't be shown, depending on the setting in
Appearance > Theme Options > Portfolio (see the
2.3 Portfolio subchapter).
Show About Author
Decide whether or not to display "About Author" box in the portfolio item. If you choose the
By Theme Options item from the dropdown list, the box will or won't be shown, depending on the setting in
Appearance > Theme Options > Portfolio (see the
2.3 Portfolio subchapter).
Show Share This
Decide whether or not to display "Share This" box in the portfolio item. If you choose the
By Theme Options item from the dropdown list, the box will or won't be shown, depending on the setting in
Appearance > Theme Options > Portfolio (see the
2.3 Portfolio subchapter).
Thumbnail
You may want not to use the same image for the portfolio item and for its preview in list of portfolio items (Columns of Items). If so, click the [Choose media] button
and select an image to be used as thumbnail. the thumbnail will be placed in the position you have specified in
Portfolio > Portfolio Categories > your parent category > (Show on Top, Show on Top - Hover, Show on Bottom or
Show on Top - Hover).
To remove the thumbnail, click the [Remove] button.
Thumbnail 2
If the parent portfolio category's
Display on Page option has been set to
Columns of Items, the thumbnail image that you set here will be displayed as the second one, placed in the position you have specified in
Portfolio > Portfolio Categories > your parent category > (Show on Top, Show on Top - Hover, Show on Bottom or
Show on Top - Hover). To set the image, click the [Choose
media] button and select an image to be used as the second thumbnail. To remove the
thumbnail, click the [Remove] button.
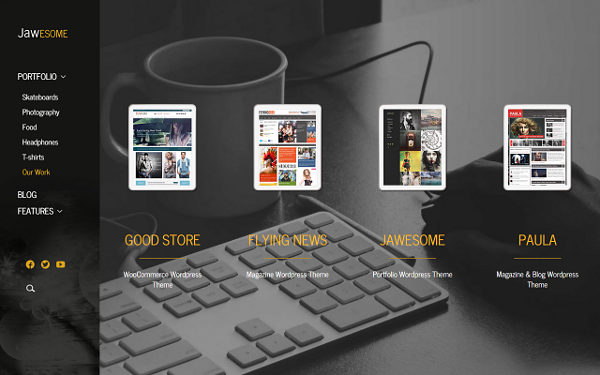
An example of appearance of Thumbnail images in case of that a parent category's Show on Top option
has been set to Thumbnail. Compare with the picture below.
Another example shows on hover effect applied (see the FLYING NEWS item), where the Thumnail 2 image
appears if a parent category's Show on Bottom - Hover option has been set to Thumbnail 2.
Icon
You can choose an icon to be shown above the portfolio
item (compare with the
Thumbnail 2 feature above). To get list of available icons, visit
this
page. Find the icon you like and put/type its class name into the empty
field.
Icon 2
Similarly to the
Thumbnail 2 image option described above, if the parent portfolio category's
Display on Page option has been set to
Columns of Items, you can choose a second icon to be shown in the placement of your choice (see explanation of the
Thumbnail 2 option above). To get list of available icons, visit
this
page. Find the icon you like and put/type its class name into the empty field.
Description 2
Fill the field with a portfolio item description text to be displayed in the placement you have specified in
Portfolio > Portfolio Categories > your parent category > (Show on Top, Show on Top - Hover, Show on Bottom or
Show on Top - Hover). Be aware, that the "Description 2" option works only if the parent portfolio category's
Display on Page option has been set to
Columns of Items.
You may use HTML tags in the description.
Menu
You can set your menu in a common way you know from Wordpress (in
Appearance > Menus). However, when both the
JaWesome theme and the
JaW Menu for JaWesome template plugin are activated, you can find there a new
Select JaW Menu Locations box added beyond the scope of standard options. If you use several menu positions, this feature allows you to assign the JaW menu to the position you need. the feature also ensures that your submenus are opened permanently.
- NOTE: Be aware, that you can only use one JaW Menu.
- NOTE: the permanently opened submenu ability doesn't work if the main panel/menu has been placed at the top of page using the Main Panel Placement option in Appearance > Theme Options.
Widgets
The theme comes with the
J&W - About Author and
J&W - Rate Post widgets included in the
JaW Widgets plugin which needs to be installed separately. After you install the plugin, go to
Plugins > JaW Widgets and tick or uncheck the J&W widgets you want or don't want to have available between widgets in
Appearance > Widgets settings.
You can use these widgets in sidebar beside your posts (to set your custom sidebars, go to
Appearance > Theme Options > Side Manager. For more information, see the
2.5 Sidebar Manager subchapter). To put a chosen widget into the post sidebar you have created in the Side Manager mentioned above, simply place it into the sidebar to the position you prefer, using drag and drop method. Then customize content of the widget clicking on it and choosing the required item from the drop-down list or filling the field as follows:
J&W - About Author Widget
Decide whether to show author of the actual post, in the side "About Author" box, or to show there a global author (one of those, you have added in
Users > All Users). Choose a desired option from the
Show Author drop-down offer.
J&W - Rate Post Widget
Use this widget to globally enable displaying of ratings in sidebar beside posts. Displaying of the ratings for each separate post, however, depends on the
Show User Rating option in the post's
General Settings (see the
4. Posts chapter). If you want to show a title above rating stars, type it in the "Ratings Title" field or leave the field empty (to display rating without title).
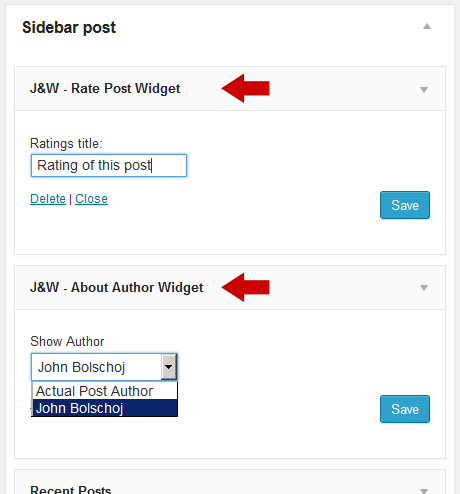
Compare settings of both of the J&W Widgets (fig. above) with their appearance on a real sample page below.
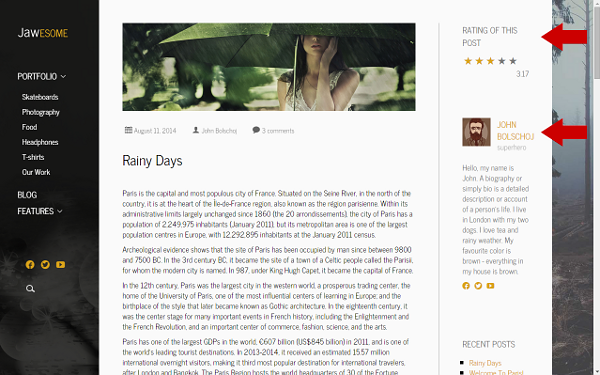
- REMEMBER: the J&W Rate Post Widget can be displayed only in the posts whose Use User Rating option has been enabled. See the 4. Posts chapter.
Shortcodes
WordPress Shortcodes are a simple set of functions for creating macro
codes to be used in post and page content. the JaWesome portfolio theme
comes with several shortcodes allowing you to easily add styled content to
your site. Some of them allow you to completely redefine the post or page
content. Some shortcodes can embed files or create objects, some others
can change the layout of the content. Conveniently, the available
shortcodes have been included under the dropdown button in the WYSIWYG
content editor which you can use when you add or edit the Posts or Pages.
- NOTE: In case of pair shortcodes you always
need to put the part of your content which you wish to be affected,
between the two bracketed code elements. Use the following syntax:
[shortcode]Your text...[/shortcode].
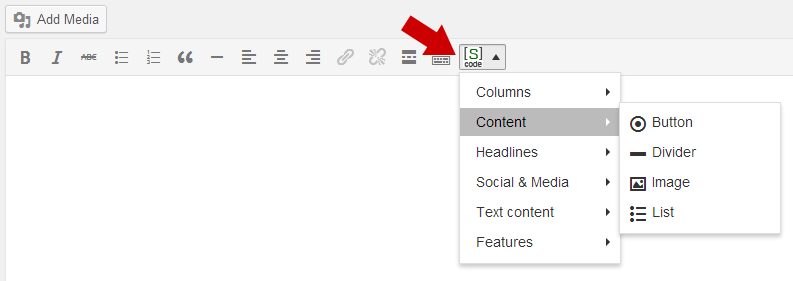
Click the
shortcode button to open up a dropdown list of the available shortcodes
and their settings.
Columns: Choose this item if you want to wrap your
paragraph into some of the offered variants of columns.
Content: You can add several content elements or parts of
content like buttons, dividers, images and lists into your content.
Headlines: You can use H1 to H6 tags for your titles and
subtitles.
Social & Media: This set of shortcodes allows you to
set and put social icons into your post.
Text Content: You can format your text using a block
quote style you choose.
Features: There are several useful features you can add
to your content (contacts, galleries, Google maps, icons)
Typography
Get inspired of some prestyled typography in our
demo.
Sources and Credits
Special thanks to mr. Stephen Jennings and Fabricio Brochier who have provided their graphics that you can see on our demo site: